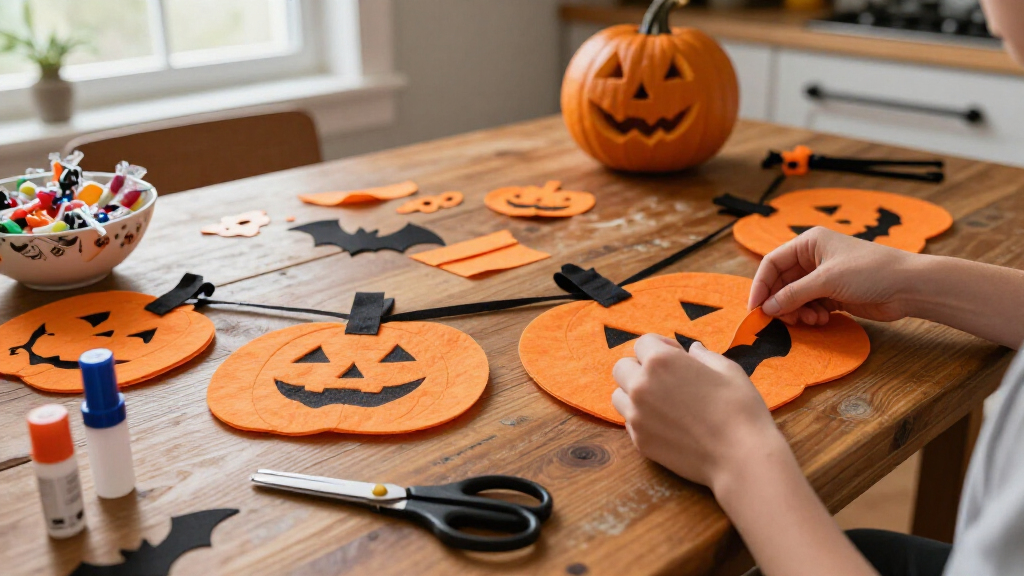

Gather the right Halloween art and craft supplies for a specific activity, then set them up so everyone can start safely and finish their project. This guide is for parents, teachers, and party hosts planning crafts for children or mixed-age groups. Allow 30-60 minutes to plan, check what you have, shop for missing items, and prepare the workspace.

Get art and craft supplies delivered free with Prime
- Fast, free delivery on millions of items
- Prime Video, Amazon Music and more included
- Member-only deals all year
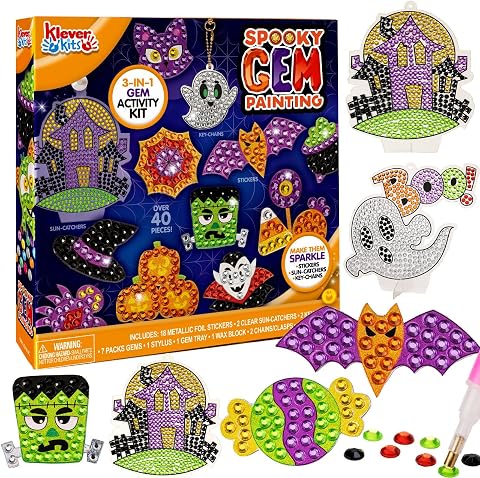
Klever Kits Halloween Gem Diamond Art Kit for Kids – Stickers, Suncatchers & Keychains Party Craft Set
- ✔ Kit type: Halloween diamond art
- ✔ Included projects: 18 stickers, 2 suncatchers, and 2 keychains
- ✔ Embellishments: 7 packs of gems

Imagimake DIY Jelly Stickers: Spooky Friends Craft Kit
- ✔ Craft type: Paint-your-own jelly stickers
- ✔ Project quantity: More than 10 spooky stickers
- ✔ Paint: 7 glass paint tubes

COCHIE 24-Pack Halloween Wood Crafts to Paint Set – Unfinished Wooden Witch, Ghost, Owl & Pumpkin Cutouts with Ropes
- ✔ Pieces: 24 wooden cutouts
- ✔ Designs: 6 patterns, 4 of each
- ✔ Material: Unfinished wood
Difficulty: Beginner | Time: 30-60 minutes
What You’ll Need
Tools & Materials:
- A list of planned Halloween projects
- Paper or a device for making a supply checklist
- Measuring tape or ruler if projects need specific sizes
- Storage bins or trays
- Age-appropriate scissors, glue, markers, and other project tools
Knowledge:
- Approximate number and ages of participants
- Basic familiarity with the planned craft or a sample project
- Awareness of allergies, sensory needs, and supervision requirements
Decide whether supplies are for one activity, several projects, or a general craft table. Check household, school, or venue rules for allergens, small parts, glitter, and sharp tools before buying. Leave time for delivery if ordering online.
Klever Kits Halloween Gem Diamond Art Kit for Kids – Stickers, Suncatchers & Keychains Party Craft Set
When we want a Halloween activity that can get underway without bringing out glue or paint, Klever Kits is the most complete choice in this lineup. The self-adhesive foil designs take gem embellishments with a stylus, tray, and wax block, so the basic process is straightforward for children and beginners. Its mix of stickers, suncatchers, and keychains also produces more varied keepsakes than Imagimake’s single sticker format.That variety does not make it a strong fit for every group. There are only two suncatchers and two keychains, so those formats will not stretch far if every child needs one. The 18 stickers give a party host more pieces to distribute, but this is still a small kit rather than a bulk class pack. Compared with COCHIE’s 24 wooden blanks, it calls for less preparation but leaves less room for painting and free-form design. We’d choose it for a short, low-mess activity; for a session centered on painting, Imagimake or the wooden cutouts offer a different kind of engagement.
Pros:
- Includes stickers, suncatchers, keychains, gems, and application tools.
- Self-adhesive designs avoid the need for glue.
- Multiple project formats offer more variety than a sticker-only activity.
- A practical fit for parties, school activities, or beginner crafting.
Cons:
- Only two suncatchers and two keychains are included.
- The gem embellishment format offers less free-form painting than the wood or jelly sticker kits.
Best for: Children and beginners who want several Halloween gem projects with the tools and embellishments included.
Not ideal for: Large groups needing a suncatcher or keychain for every participant, or crafters who want to paint their own shapes.
Bottom line: We recommend Klever Kits when an easy-start, low-mess mix of Halloween projects matters more than having a large quantity of any one project type.
“We recommend Klever Kits when an easy-start, low-mess mix of Halloween projects matters more than having a large quantity of any one project type.”
Imagimake DIY Jelly Stickers: Spooky Friends Craft Kit
Imagimake makes the most sense for younger children, with an age recommendation of 3 years and up and a simple creative sequence: paint the templates, let them dry, then peel and stick them onto a smooth surface. Seven glass paint tubes and an expression sticker sheet give children ways to personalize more than 10 spooky stickers. Where Klever Kits focuses on applying ready-to-use gems, this kit asks children to make the decoration itself, so it offers a more paint-centered activity.The extra creative step also affects timing: the stickers need to dry before they are ready to display. That makes Imagimake less convenient than Klever Kits for a quick party station, especially if the finished art is meant to go home immediately. Its stickers are intended for smooth surfaces, so it is not a general-purpose craft for decorating fabric, rough walls, or ornaments. Compared with COCHIE’s wooden shapes, Imagimake is easier to position on windows or similar surfaces and is recommended for a much younger age group, but it offers less variety in what the finished object can be.
Pros:
- Age guidance starts at 3 years and up.
- Includes templates, seven paint tubes, an expression sticker sheet, and instructions.
- Makes more than 10 peel-and-stick Halloween decorations.
- Painting gives children room to customize their spooky designs.
Cons:
- Templates need to be painted and dried before the stickers can be used.
- Finished stickers are intended for smooth surfaces.
Best for: Families seeking a screen-free painting activity for children ages 3 and up, with spooky stickers to display on smooth surfaces.
Not ideal for: Crafters who need finished projects immediately, want decorations for varied surfaces, or prefer a no-paint activity.
Bottom line: We’d pick Imagimake for a younger child who enjoys painting and can wait for the designs to dry before decorating a window or other smooth surface.
“We’d pick Imagimake for a younger child who enjoys painting and can wait for the designs to dry before decorating a window or other smooth surface.”
COCHIE 24-Pack Halloween Wood Crafts to Paint Set – Unfinished Wooden Witch, Ghost, Owl & Pumpkin Cutouts with Ropes
For a craft session where we want participants to invent their own color schemes, COCHIE supplies the most blank-canvas flexibility. The set has 24 unfinished wooden cutouts across six designs—witch, ghost, black cat, pumpkin, owl, and skull—with four of each. Their smooth, polished surfaces on both sides are intended for painting and decorating, and ropes are included so finished pieces can be hung. That makes this the strongest option here for producing a batch of personalized Halloween ornaments.The catch is that the box supplies the shapes, not the full activity: paint and other decorating materials are not included. We’ll need to gather those in advance, while Klever Kits arrives with gems and application tools and Imagimake includes paint. The listed age range is 16 and above, which also makes this less immediately suitable for a young children’s group than either kit marketed to kids. At about 2 mm thick, the cutouts are lightweight, but they can be fragile if handled roughly. Choose COCHIE for older crafters or a well-prepared classroom; skip it when easy setup or preschool age guidance is the priority.
Pros:
- Includes 24 cutouts across six Halloween designs, with four of each.
- Smooth, polished surfaces on both sides are suited to decorating.
- Ropes are included for hanging finished ornaments.
- Blank wooden shapes allow more open-ended designs than gem stickers or templates.
Cons:
- Paint and other decorating supplies are not included.
- The listed age range is 16 and above.
- The 2 mm cutouts may be fragile if handled roughly.
Best for: Older crafters, teachers, or hosts with paint on hand who want a larger batch of customizable hanging Halloween decorations.
Not ideal for: Young children crafting independently, anyone wanting an all-in-one kit, or groups that need sturdy pieces for rough handling.
Bottom line: We recommend COCHIE when quantity and custom-painted ornaments matter more than an all-in-one kit or a child-focused age recommendation.
“We recommend COCHIE when quantity and custom-painted ornaments matter more than an all-in-one kit or a child-focused age recommendation.”
As an Amazon Associate we earn from qualifying purchases.
Before You Start
Choose the projects before shopping. A paper-bag ghost, painted pumpkin, and wearable mask each need different materials, so a theme alone is not a useful shopping list. Test one sample when possible; this reveals how much material each project uses and whether the steps suit the group.
For children’s activities, check product labels and follow age guidance. Keep small pieces, hot glue, craft knives, and other tools that require adult handling out of children’s reach. Provide good ventilation when using paints, adhesives, or sealants, and follow each product’s label.
Step-by-Step Instructions
Step 1: Choose the projects
Write down each Halloween craft you plan to offer and name the finished item participants will make. Specify each activity, such as “decorate one paper lantern” or “make two cardstock bats,” instead of writing “Halloween decorations.” Mark optional projects and note which ones will share supplies.
Tip: For a short event, select one main craft and one simple backup. Too many choices can make setup and supply counts difficult.
Check: You have a short project list with a clear finished item for every activity.
Step 2: Set the participant count and age range
Record how many people will craft and their approximate ages. Include adults who will make projects and need their own materials. Use the youngest participants’ abilities to guide tool choices, and assign adult help for steps such as cutting thick card or attaching small parts.
Tip: If attendance is uncertain, prepare a small reserve of shared basics instead of buying a full extra kit for every person.
Check: Your plan accounts for the group size, likely attendance changes, and supervision needs.
Step 3: Make a supply list for each project
List the materials and tools each project uses. Include the base item, decoration materials, adhesives, and finishing pieces. For example, a paper plate pumpkin may need plates, orange paint or paper, green paper, glue, and markers. Separate consumable materials from reusable tools such as rulers and paintbrushes.
Check each package’s stated quantity and compare it with the number of projects. If one person needs three sheets and you expect eight participants, plan for at least 24 sheets, plus a modest reserve for mistakes or damaged pieces.
Tip: A sample project gives a better estimate than guessing. Count the pieces used to make one, then multiply by the planned number of participants.
Check: Every project has a materials list with quantities based on the group size.
Step 4: Check materials for age and safety
Review product labels for recommended ages, warnings, drying times, and cleanup instructions. Choose washable, non-toxic products when suitable for the activity, and check with caregivers or the venue about known allergies. Replace small decorations that could pose a choking risk for young children with larger paper shapes or stickers.
Identify which tasks need adult handling. Keep hot glue, craft knives, pins, and sharp scissors at an adult station, or substitute school-safe glue and blunt-tip scissors where they can do the job.
Tip: A product marked non-toxic still needs to be used as directed. Do not use craft materials on skin or food unless the label says they are suitable for that purpose.
Check: Materials suit the participants, and the plan identifies any tools or steps that require adult supervision.
Step 5: Inventory supplies you already have
Gather your project list and inspect existing craft supplies. Test markers to confirm they work, check that glue is usable and paint has not dried out, and inspect reusable tools for damage. Count usable quantities instead of assuming a partly full container will cover the group.
Mark each item as available, low, or missing. Set aside the supplies for the projects so they are not accidentally used for something else before the event.
Tip: Check color and size as well as quantity. Black paper in a small scrap pile may not replace the full sheets needed for several bats.
Check: You know which listed items are ready to use and which need to be replaced or purchased.
Step 6: Buy only the missing supplies
Shop from the remaining list and compare package quantities with your calculations. Buy the materials required to complete each project first, then add optional decorations such as googly eyes, ribbon, or themed stickers if the budget allows. Choose substitutes only when they fit the project and participant ages.
Check that paints, markers, and adhesives work on the selected materials. For example, some markers may bleed through thin paper, and some glues may not hold heavier decorations securely.
Tip: Keep receipts and packaging until you have checked the contents and confirmed that the supplies match the project plan.
Check: The supplies on hand cover the expected number of projects, including essential adhesives and tools.
Step 7: Prepare and label the workspace
Cover the work surface with reusable mats or paper, and place a waste bin and cleanup materials within reach. Divide supplies by project in trays or bins. Put shared items such as markers in a central area, and give each participant a base item and the materials needed to begin.
Separate adult-use tools from child-accessible supplies. Mark a clear drying area for completed work if paint or glue needs time to dry.
Tip: Open packaging in advance when safe to do so, but keep labels available for product directions and warnings.
Check: Participants can identify their project supplies, reach shared materials, and keep finished work separate from the work area.
Step 8: Test the setup before the activity
Make one project using the prepared materials, tools, and steps participants will use. Check that pieces fit, adhesives hold, colors show clearly, and the process fits the available time. Adjust quantities or replace materials if the sample reveals a problem.
Tip: Allow for paint or glue drying time when deciding whether participants can take projects home immediately.
Check: A sample craft works with the selected materials and fits the planned activity time.
Common Mistakes to Avoid
- Buying supplies based only on a Halloween theme. — Select the projects first and make a separate list for each one so essential materials are not missed.
- Underestimating how much paper, glue, or decoration material the group will use. — Make a sample, count its material use, multiply by the participant count, and add a small reserve.
- Choosing decorations or tools that do not suit the youngest participants. — Check age labels, avoid choking-size pieces for young children, and reserve sharp or hot tools for adults.
- Setting out every supply at once. — Sort materials by project and introduce shared or messy items when they are needed to reduce spills and waste.
Troubleshooting
Problem: The adhesive does not hold a decoration in place.
Solution: Check the glue label for suitable materials, apply it to clean dry surfaces, and allow the recommended setting time. Use a stronger age-appropriate adhesive or lighter decorations if needed.
Problem: Paint or markers bleed through the craft base.
Solution: Place scrap paper underneath, switch to thicker paper or card, or use a coloring material labeled for that surface. Test it on a spare piece before continuing.
Problem: A project takes longer than the event allows.
Solution: Remove optional steps, prepare cut shapes in advance, or offer a simpler version. Keep drying time in the schedule and provide a safe way to transport unfinished work.
Problem: A key supply runs out during the activity.
Solution: Use the reserve materials first. If none remain, offer a compatible substitute, such as paper cutouts instead of small plastic decorations, and update the quantity plan for next time.
What Success Looks Like
The setup is ready when every planned project has enough suitable materials for the expected group, tools match participant ages, and supplies are sorted where people can find them. A sample project should be complete or have a clear, tested process, and the workspace should have a place for waste, cleanup, and drying finished crafts.
Next Steps
After crafting, let paint and glue dry as directed, then pack each participant’s work in a labeled bag or tray. Sort reusable tools back into storage, seal paints and adhesives, and discard damaged materials according to their labels. Record which supplies ran short or remained unused so the next Halloween craft session is easier to plan.
Frequently Asked Questions
How many supplies should I buy per person?
Calculate the amount used in one sample project and multiply by the number of participants. Add a modest reserve for mistakes, damaged pieces, and uncertain attendance. Shared tools such as scissors usually do not need to be provided one per person.
What Halloween crafts work well for a mixed-age group?
Choose a project with a simple base that people can decorate at different levels, such as paper masks, lanterns, or cardstock pumpkins. Offer larger, easy-to-handle decorations for younger children and optional details for older participants.
Can I use leftover craft supplies from last year?
Yes. Check that paper is clean and dry, markers still write, paint has not dried or changed unexpectedly, and adhesives remain usable. Follow product labels and discard any item that is damaged or past its usable condition.
How can I reduce mess at a Halloween craft table?
Cover surfaces, set out only the materials needed for the current step, and keep a waste bin and wipes nearby. Use trays to contain small pieces, and choose washable materials when they suit the project.
Halloween Picks
halloween
As an affiliate, we earn on qualifying purchases.