TL;DR
A closet rig focuses on controlling reflections and reducing echo rather than full soundproofing. Strategic placement and DIY dampening materials make a small space sound professional without breaking the bank or risking heat buildup.
Ever tried recording vocals or making music in a tiny closet? It can feel like you’re singing inside a tin can—echoes, reflections, and low-end booms everywhere. But here’s the kicker: you don’t need a soundproof vault. Instead, you need smart acoustic dampening, strategic placement, and a little DIY ingenuity. This is about controlling what’s inside the room, not sealing out every sound from the outside world. For more on room acoustics, see Acoustic Dampening, Placement, and the “Rig in the Closet” Setup.
In this guide, I’ll show you how to make your closet a serious audio space. From understanding the difference between dampening and soundproofing, to pinpointing the best spots for your mic and treatment, you’ll learn how to turn that tiny box into a functional, sound-friendly zone. Whether you’re recording vocals, gaming, or just want better audio for calls, these tips will get you there.
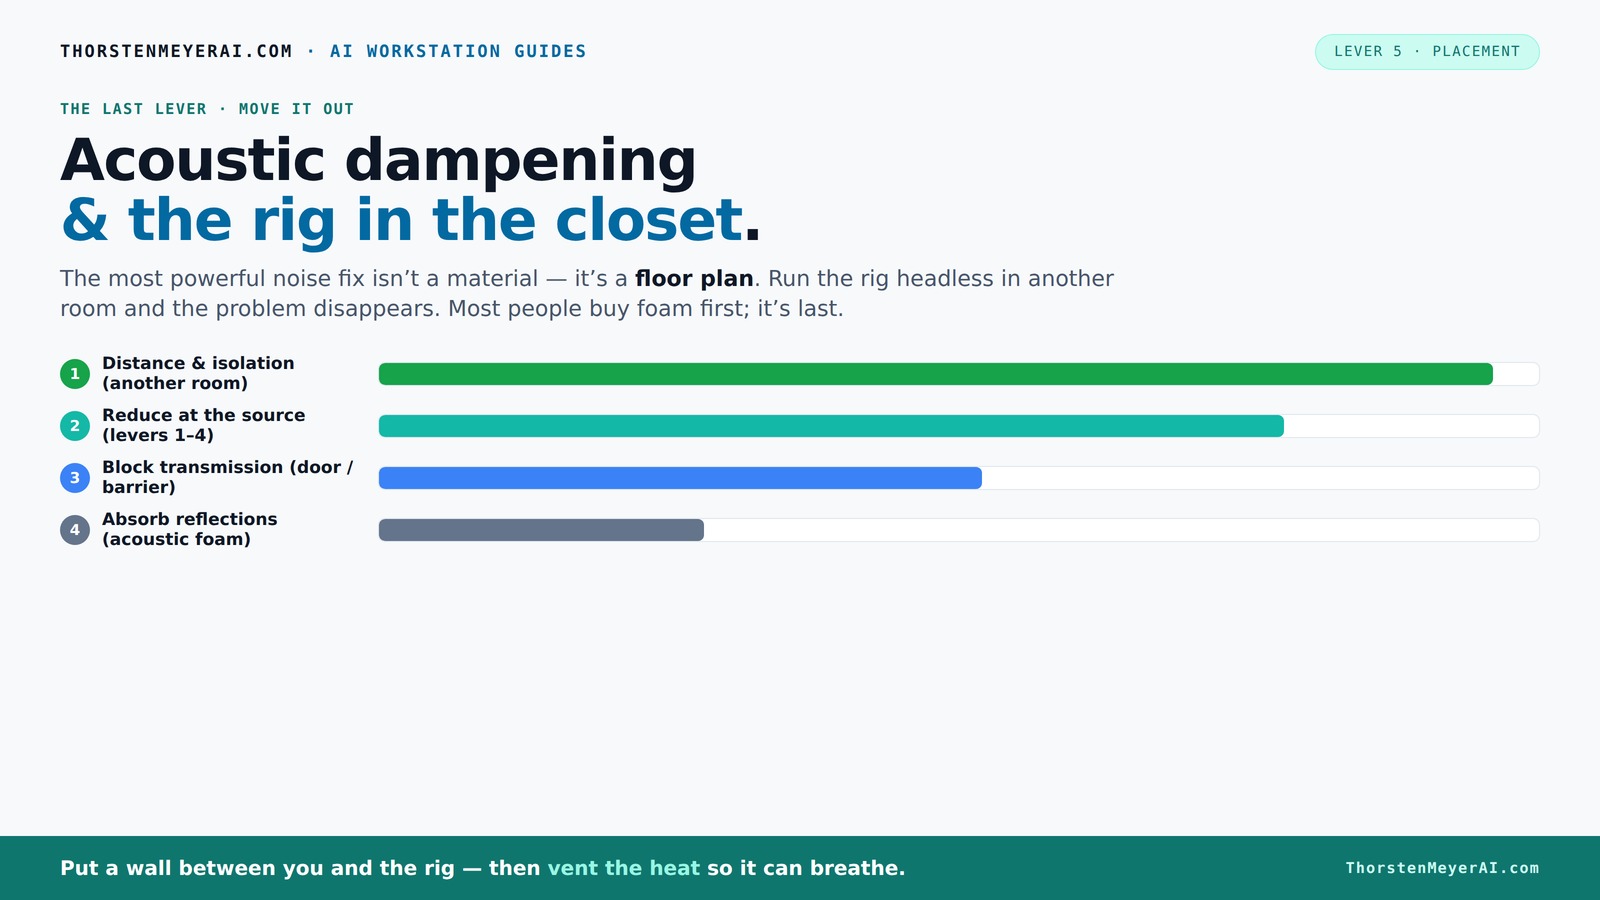
Acoustic dampening
& the rig in the closet.
The most powerful noise fix isn’t a material — it’s a floor plan. A rig you can’t hear because it’s in another room beats any amount of foam. Tap the approaches in Part 1 to see what actually works.
(another room)
(levers 1–4)
(door / barrier)
(acoustic foam)
Contain the noise, not the heat
Key Takeaways
- A closet rig is mainly about controlling reflections and bass, not total soundproofing.
- Position your mic carefully—6-12 inches from your mouth and at reflection points for best sound.
- Use DIY materials like blankets, foam panels, and rugs to absorb high frequencies and reduce echo.
- Always seal gaps around the door and treat nearby hard surfaces to prevent sound leaks.
- Ensure good ventilation to prevent heat buildup in sealed or enclosed closet setups.

Focusound 52 Pack Acoustic Foam Panels 1" x 12" x 12" Sound Proof Foam Panles Soundproofing Noise Cancelling Wedge Panels for Home Office Recoding Studio with 300PCS Double-Side Adhesive
Soundproofing - Acoustic foam panels triangular grooves structure for better noise absorption, helps to reduce and absorb unwanted...
As an affiliate, we earn on qualifying purchases.
As an affiliate, we earn on qualifying purchases.
What a closet rig is and what it’s not — debunking the myth of total soundproofing
A closet rig isn’t a soundproof room. It’s a controlled acoustic space. Think of it as a cozy cave that dampens echoes and reduces outside noise, but it won’t block every sound from sneaking out or in. You’ll see plenty of DIY setups with blankets and foam, but they mainly focus on making the space less echoey, not sealed tight.
For example, hanging a thick blanket over the door can cut down a lot of high-frequency reflections, but a loud truck outside will still be audible. The goal is to manage the sound within that small space and keep reflections from bouncing around, not to isolate it completely. According to soundproofing experts, true soundproofing requires massive barriers, double walls, and specialized construction—way beyond a closet’s scope.
So, if your main concern is reducing echo and room reverb, you’re on the right track. If you want to block out all outside noise, you’ll need a different approach—like building a dedicated, sealed booth or using active noise-canceling tech.
Focusound 52 Pack Acoustic Foam Panels 1" x 12" x 12" Sound Proof Foam Panles Soundproofing Noise Cancelling Wedge Panels for Home Office Recoding Studio with 300PCS Double-Side Adhesive
Soundproofing - Acoustic foam panels triangular grooves structure for better noise absorption, helps to reduce and absorb unwanted...
As an affiliate, we earn on qualifying purchases.
As an affiliate, we earn on qualifying purchases.
How acoustic dampening works in small spaces — the secret to a professional sound
Acoustic dampening in a tiny closet is all about absorbing reflections and controlling low-end buildup. Hard surfaces like walls, floors, and ceilings reflect sound waves, creating that boxy, hollow sound. The goal is to break those reflections and tame the bass.
Think of it like throwing a thick blanket over a mirror to soften its reflection. In a closet, thick foam panels—like 2-inch thick ones—work wonders. Placing bass traps in corners is especially effective because low frequencies tend to accumulate there. You can learn more about effective acoustic treatment materials at owncrafting.com.
One simple example: placing a dense foam panel behind your mic reduces the echo bouncing back into the microphone capsule, resulting in clearer vocals. You can also put a rug on the floor to absorb reflections from the hard surface, which is often overlooked but makes a big difference.
According to research, thicker absorbers (around 2 inches) are better at soaking up bass frequencies typical in small rooms, preventing that “boomy” sound that ruins recordings.

Cheerock 4Pcs Adjustable Rubber Microphone Holder Clips, Flexible Handheld Mic Stand Accessories, Shockproof Design with 29-32mm Inner Diameter Range, Black
Versatile Compatibility: Cheerock's adjustable microphone holder clips are designed to fit most wireless handheld microphones with an inner...
As an affiliate, we earn on qualifying purchases.
As an affiliate, we earn on qualifying purchases.
Best placement tips for your mic, your voice, and acoustic treatment in a tiny closet
Placement is king in a small space. Start by positioning your microphone about 6-12 inches from your mouth, aiming slightly above or below to reduce popping and sibilance. Then, treat the main reflection points: the wall behind you, the ceiling above, and the side walls.
Imagine your mic as the centerpiece of a tiny stage. Place foam panels directly behind it—those are the primary reflection points. Use a mirror trick: hold a mirror flat against the wall and look for where the mic’s sound bounces back. That’s where to put absorbers.
Don’t forget the door gap—seal it with weatherstripping or a draft blocker to prevent sound leaks. And treat nearby hard surfaces, like your desk, with blankets or foam to prevent sound bouncing off those. For bass issues, add traps in the corners where low frequencies pile up.
One practical step: set up a portable reflection filter around your mic for vocals, which can cut out room sound and make your voice stand out cleaner.
DIY closet sound treatment kit
As an affiliate, we earn on qualifying purchases.
As an affiliate, we earn on qualifying purchases.
DIY materials that work—cheap, easy, and effective for small closet spaces
On a budget? No problem. The simplest DIY acoustic treatment involves hanging moving blankets or thick quilts over walls and the door. They absorb high frequencies and reduce echo. Combine that with foam panels—2-inch thick ones are a sweet spot for small spaces here.
For bass, place inexpensive bass traps in the corners—think of these as the “low-end vacuum cleaners” that suck up rumble. You can make your own by stuffing mineral wool or fiberglass into cardboard tubes or fabric bags.
Flooring matters too. Adding a thick rug or carpet softens reflections from the floor, especially if you have hardwood or tile. Use tape or tacks to attach foam panels or blankets temporarily, so you can experiment without permanent damage [1].
Remember, sealing gaps around the door with weatherstripping or draft stoppers significantly improves sound isolation for a tiny booth.
Common mistakes in closet booths and how to avoid them
Many folks make the mistake of overusing foam without addressing placement. Foam absorbs high frequencies but does little for bass or echoes from hard surfaces. Over-treating can make your space sound dull or dead. For more tips, see this guide.
Another mistake: sealing the closet completely without ventilation. This traps heat, which can overheat your rig and cause components to throttle, reducing performance and risking damage. Always include some form of airflow—passive vents or small exhaust fans here.
Also, ignoring the door gaps—sound leaks through cracks. Seal them with weatherstripping or acoustic sealant. And don’t forget to treat the nearby surfaces—hard desks, shelves, or windows—because they reflect sound directly into the mic.
Finally, trying to make a closet perfect without testing. Use a simple recording app, listen critically, and adjust your treatment until it sounds balanced. Small tweaks make big differences. For more on recording techniques, visit deadsetlive.com.
FAQ: Your quick guide to closet recording and treatment questions
- What is the difference between acoustic dampening and soundproofing? Acoustic dampening reduces echoes and reflections inside a space. Soundproofing blocks sound from entering or leaving. Most closets focus on dampening, not full soundproofing.
- Can a closet really become a vocal booth? Yes, with proper treatment, a closet can sound remarkably good for vocals and recording. It’s about managing reflections and controlling bass buildup.
- Where should I place my mic in a closet? Position about 6-12 inches from your mouth, targeting reflection points—usually the wall behind and the ceiling above—using the mirror trick.
- Do I need foam, blankets, or bass traps? Use a combination: foam panels for mid/high frequencies, blankets for general absorption, and bass traps for low-end issues. Each plays a role in a balanced setup.
- How much treatment is enough? Start with a few foam panels and a bass trap or two. Listen critically, then add more if needed. Small adjustments yield the best results.
Conclusion
Your closet can become a surprisingly effective recording space—if you treat it smartly. Focus on managing reflections and controlling low-end, not sealing it like a vault. A little DIY effort and strategic placement will turn that tiny room into a professional-sounding booth.
Remember, sound treatment isn’t about perfect silence but about shaping how sound behaves inside your space. Keep testing, tweaking, and listening, and you’ll find the sweet spot for your voice or instrument. Your next great recording could be just a few blankets away.